XLerobot R550 底盘补充说明
1. 系统架构和组装
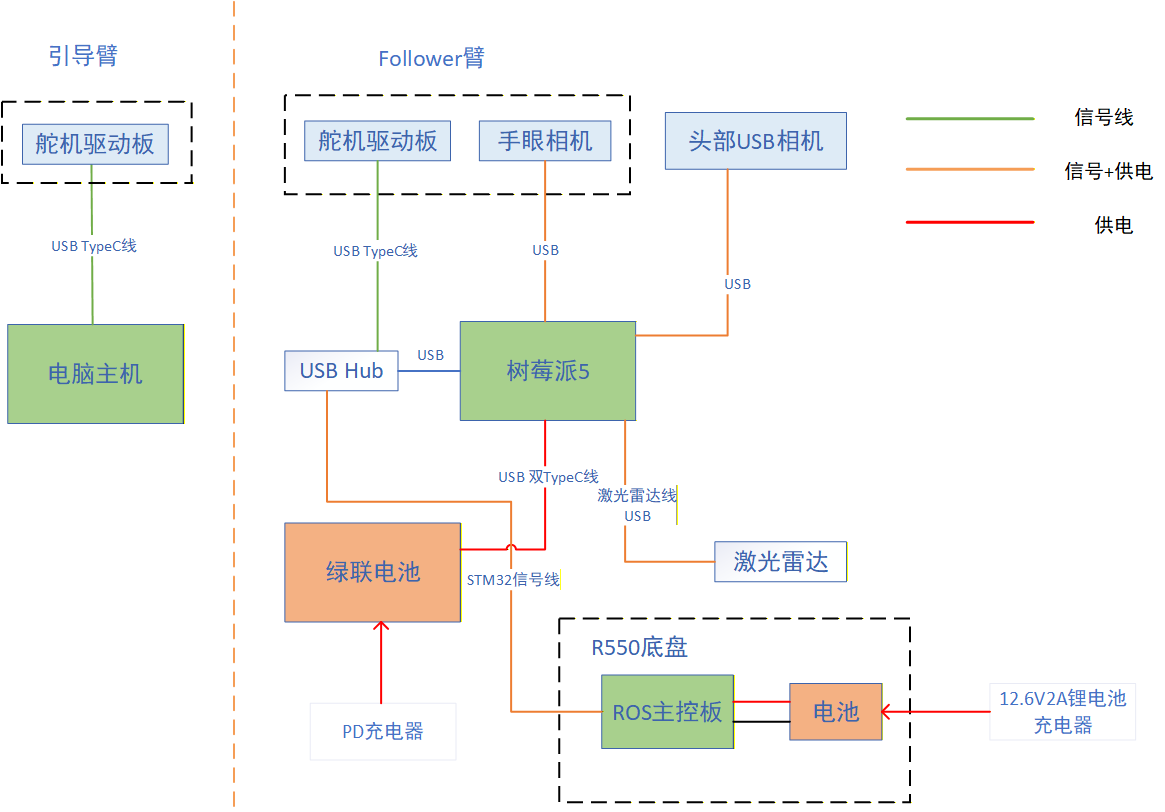
1.1 整体架构图
1.2 组装
接线指引:XLeRobot项目指引(Jetson Orin版补充)
底盘:底盘目前由R550底盘上的电池单独供电。充电也需要单独使用12.6V 2A的锂电池充电器给底盘上的电池充电(非绿联电池)
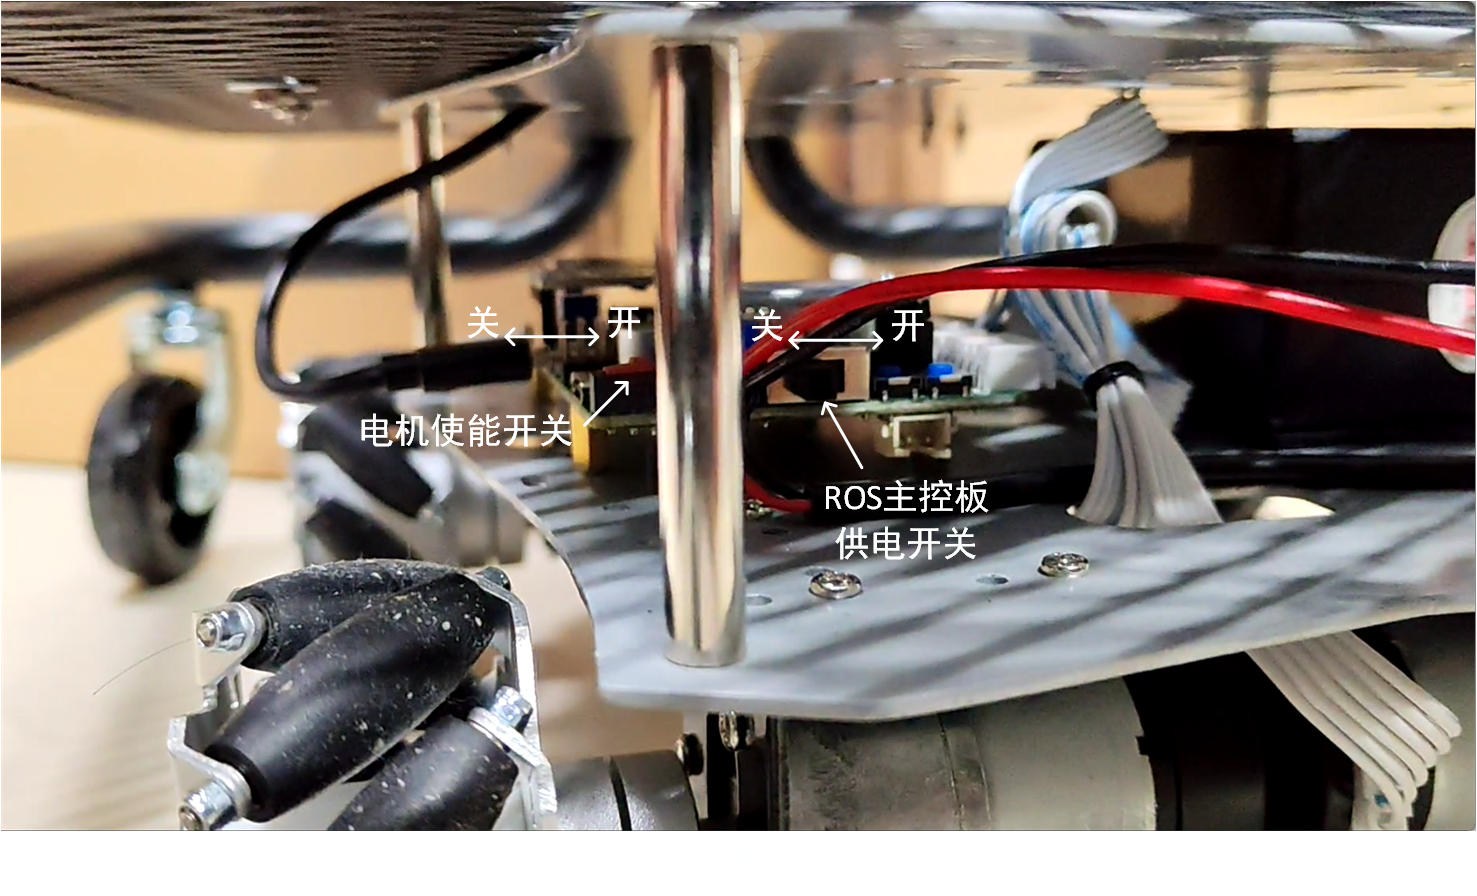
1.3 底盘开关
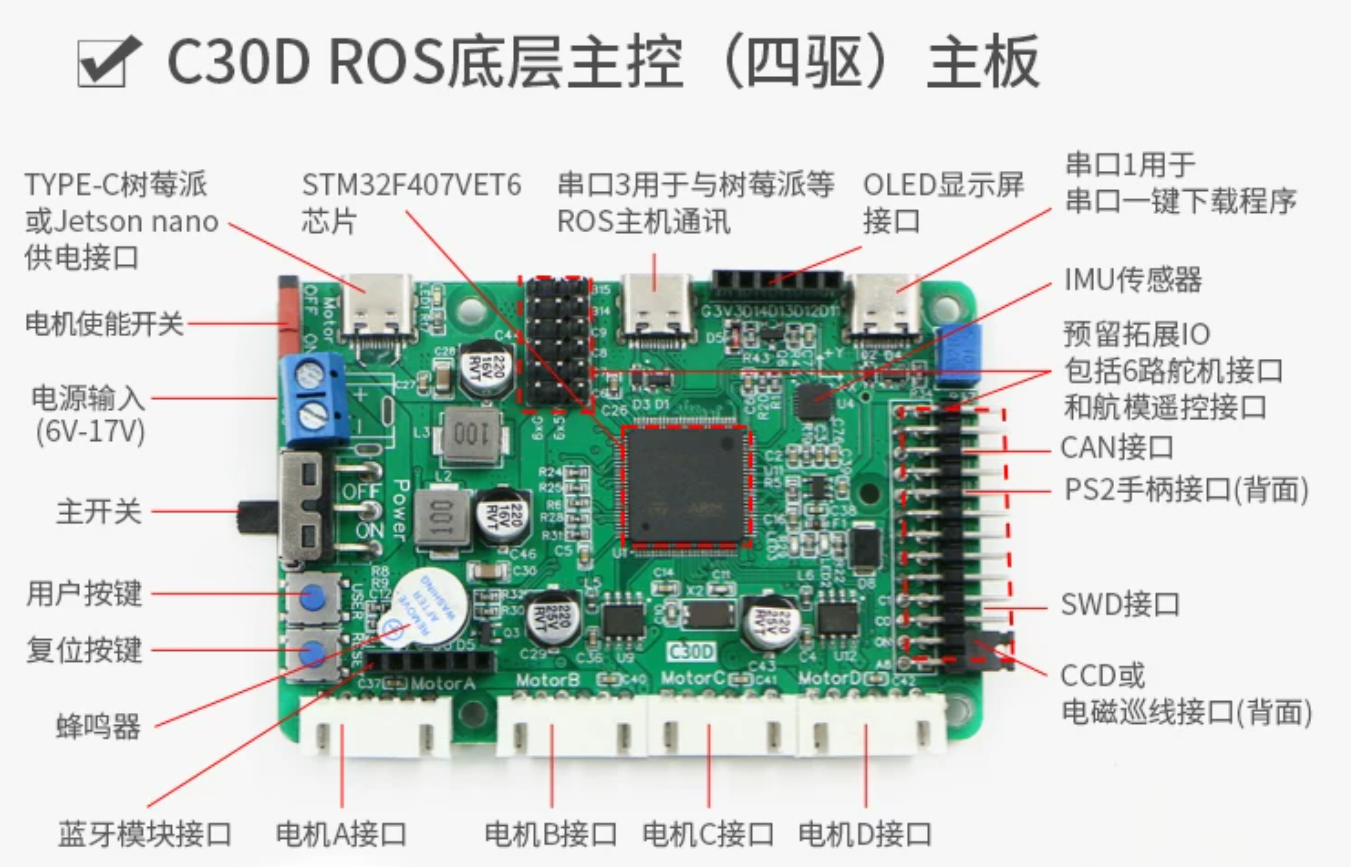
运动控制板 C30D
2. 软件系统环境
2.1 树莓派系统
登录用户名:wheeltec
passwd: dongguan
树莓派开机之后,第一次通过 Micro HDMI线接显示器。
通过USB Hub接键盘鼠标输入。
2.2 系统相关设置
机器人本身自带的WIFI SSID: WHEELTEC_RASPBERRY5_HUMBLE
激光雷达设备文件:/dev/wheeltec_lidar
底盘控制板设备文件:/dev/wheeltec_controller
Follower机械臂端口设备文件:/dev/so101_follower_left
头部相机设备文件:/dev/camera_top
手眼相机设备文件:/dev/handeye
Follower 机械臂:R12260103
Leader 机械臂:R07260103
XLerobot编号:XLR25034
2.3 软件环境介绍
2.3.1 ROS
已经安装ros2 docker环境
树莓派每次重启后,通过以下命令启动ros2 docker container。
ros_start
通过以下命令进行docker系统(每开一个终端都要进入一次)
ros2
2.3.2 ROS 代码目录
ros 代码目录在 ~/wheeltec_ros 目录下
2.4 Lerobot
2.4.1 开发环境
lerobot 开发环境由 conda 管理。在终端非ros2 docker环境下输入以下命令进入 lerobot 开发环境。
conda activate lerobot
看到命令提示符前面有 (lerobot) 则表明成功进入 lerobot conda 开发环境。
2.4.2 代码目录
lerobot框架的代码在 ~/lerobot 目录下
xlerobot 机器人对应的控制代码在 ~/xlerobot 目录下
2.5 组装之后的初步验证
2.5.1 ROS 底盘控制
前提:先启动ROS docker,并进入ros2 docker终端
先启动底盘
ros2 launch turn_on_wheeltec_robot turn_on_wheeltec_robot.launch.py
再在另一个ros2 docker 终端开启键盘遥控
ros2 run wheeltec_robot_keyboard wheeltec_keyboard
通过键盘的以下键控制底盘运动(小写模式):
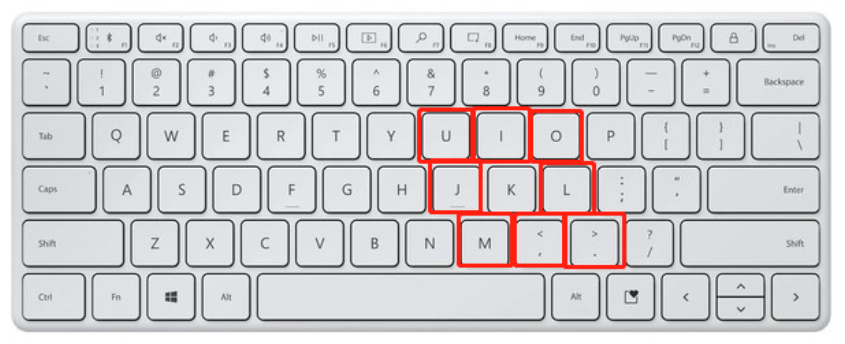
使用方法为以 k 键为中心,j向左,l向右,i向前,','向后;斜对角的4个键则是叠加转弯和前进的。
2.5.2 XLerobot 机器人相关
键盘控制机械臂和底盘
cd ~/xlerobot/software/examples
python 4_xlerobot_r550_teleop_keyboard.py --robot_id=XLR25032_r550
3. 附录
ROS相关常用指令
nfs挂载:
sudo mount -t nfs 192.168.0.100:/home/wheeltec/wheeltec_ros2 /mnt
nfs解除挂载:
sudo umount -t nfs 192.168.0.100:/home/wheeltec/wheeltec_ros2 /mnt
1、打开机器人底盘
ros2 launch turn_on_wheeltec_robot turn_on_wheeltec_robot.launch.py
2、打开底盘控制
ros2 launch turn_on_wheeltec_robot turn_on_wheeltec_robot.launch.py
3、打开相机
ros2 launch turn_on_wheeltec_robot wheeltec_camera.launch.py
4、打开雷达
ros2 launch turn_on_wheeltec_robot wheeltec_lidar.launch.py
打开雷达、相机和底盘:
ros2 launch turn_on_wheeltec_robot wheeltec_sensors.launch.py
5、打开键盘控制
ros2 run wheeltec_robot_keyboard wheeltec_keyboard
6、简单跟随功能
① 雷达跟随
ros2 launch simple_follower_ros2 laser_follower.launch.py
② 视觉巡线
ros2 launch simple_follower_ros2 line_follower.launch.py
③ 视觉跟踪
ros2 launch simple_follower_ros2 visual_follower.launch.py
③ KCF跟随
ros2 launch wheeltec_robot_kcf wheeltec_robot_kcf.launch.py
7、2D建图
①使用gmapping建图
ros2 launch slam_gmapping slam_gmapping.launch.py
②使用slam_toolbox建图
ros2 launch wheeltec_slam_toolbox online_async_launch.py
③使用cartographer建图
ros2 launch wheeltec_cartographer cartographer.launch.py
保存地图
ros2 launch wheeltec_nav2 save_map.launch.py
8、2D导航[包含多点导航]
ros2 launch wheeltec_nav2 wheeltec_nav2.launch.py
10、RTAB-MAP视觉+雷达建图
ros2 launch wheeltec_robot_rtab wheeltec_slam_rtab.launch.py
保存地图
ros2 launch wheeltec_nav2 save_map.launch.py
11、RTAB-MAP视觉+雷达导航
step1:
ros2 launch wheeltec_robot_rtab rtabmap_localization.launch.py
step2:
ros2 launch wheeltec_robot_rtab wheeltec_nav2_rtab.launch.py
12、RTAB-MAP纯视觉建图
ros2 launch wheeltec_robot_rtab wheeltec_slam_rtab_pure3d.launch.py
保存地图
ros2 launch wheeltec_nav2 save_map.launch.py
13、RTAB-MAP纯视觉导航
step1:
ros2 launch wheeltec_robot_rtab rtabmap_localization_pure3d.launch.py
step2:
ros2 launch wheeltec_robot_rtab wheeltec_nav2_rtab_pure3d.launch.py
14、ORB Slam
ros2 launch orb_slam2_ros orb_slam2_Astra_rgbd_launch.py
15、RRT 自主探索建图[顺时针/逆时针发布四个点,最后一个点发布在已知地图中]
step1:ros2 launch wheeltec_slam_toolbox online_async_launch.py
step2:ros2 launch wheeltec_robot_rrt wheeltec_rrt_slam.launch.py
16、路径跟踪:[详细操作要看功能手册]
设计路径并保存:
step1:运行导航功能
ros2 launch wheeltec_nav2 wheeltec_nav2.launch.py
step2:保存路径
ros2 launch wheeltec_path_follow save_path.launch.py
step3:键盘控制设计路径
ros2 run wheeltec_robot_keyboard wheeltec_keyboard
开启路径跟踪:
step1:运行导航功能
ros2 launch wheeltec_nav2 wheeltec_nav2.launch.py
step2:开启路径跟踪
ros2 launch wheeltec_path_follow follow_path.launch.py
17、多机编队[详细操作要看功能手册]
step1:在主车端中运行多机编队导航程序
ros2 launch wheeltec_multi navigation.launch.py
step2:在从机端中分别运行编队程序
ros2 launch wheeltec_multi wheeltec_slave.launch.py
step3:在主车端打开键盘控制节点控制主车运动
ros2 run wheeltec_robot_keyboard wheeltec_keyboard
18、ROS2 QT功能
ros2 launch qt_ros_test qt_ros_test.launch.py
19、TTS文本转音频功能
(转音频的文本内容在tts_make.launch.py文件中)
ros2 launch tts tts_make.launch.py
20、语音控制
step1:开启麦克风阵列初始化节点
ros2 launch wheeltec_mic_ros2 mic_init.launch.py
step2:开启小车功能初始化节点
ros2 launch wheeltec_mic_ros2 base.launch.py
21、骨架识别
①姿态控制(姿态控制章节、多人定向控制章节、融合RGB记忆人物章节的命令)
ros2 launch bodyreader bodyinteraction.launch.py
②人体骨架跟随(人体跟踪章节)
ros2 launch bodyreader bodyfollow.launch.py
③结合姿态控制与跟随——启动默认是姿态控制模式,双手胸前交叉是切换模式
ros2 launch bodyreader final.launch.py
22、WEB浏览器显示摄像头
step1:打开相机
ros2 launch turn_on_wheeltec_robot wheeltec_camera.launch.py
step2:
ros2 run web_video_server web_video_server
step3:浏览器输入地址后即可查看实时视频监控
23、USB手柄控制
ros2 launch wheeltec_joy wheeltec_joy.launch.py
24、自动回充功能
修改车型和电池容量
打开 auto_recharge_ros2/robot_info.yaml 文件,选择与当前小车匹配的车型和电池容量
使用自动回充功能
①先建图并保存
ros2 launch slam_gmapping slam_gmapping.launch.py
ros2 launch wheeltec_nav2 save_map.launch.py
②开启导航功能:
ros2 launch wheeltec_nav2 wheeltec_nav2.launch.py
③开启自动回充功能:
ros2 run auto_recharge_ros2 auto_recharge
在rviz上,使用话题“charger_position_update”标定充电桩的位置。根据终端提示进行使用
25、AR标签识别与跟随
①AR标签识别
ros2 launch aruco_ros aruco_recognize.launch.py
②AR标签跟随
ros2 launch simple_follower_ros2 aruco_follower.launch.py
其它常用命令
1、编译
编译全部功能包
colcon build
注意:用户修改launch文件内容后需要编译才能生效
创建符号链接编译全部功能包(推荐)
colcon build --symlink-install
注意:修改launch文件内容后无需编译即可生效
单独编译功能包
如只编译 turn_on_wheeltec_robot
colcon build --packages-select turn_on_wheeltec_robot 【--symlink-install】
规定同时编译的线程数为2
colcon build --parallel-workers 2 【--symlink-install】
2、递归修改当前(终端)文件夹下文件修改时间:
find ./* -exec touch {} ;
3、在工作空间下运行,安装ROS功能包全部依赖(镜像中已配置rosdep):
rosdep install --from-paths src --ignore-src -r -y
4、修改系统时间:
sudo date -s "2022-06-15 09:00:00"
5、使用豆瓣源进行pip安装(网速会快很多):
pip install -i https://pypi.doubanio.com/simple/ python包名
6、ssh登录:
ssh -Y wheeltec@192.168.0.100
7、给文件夹下的所有文件可执行权限:
sudo chmod -R 777 文件夹
8、打开地图路径:
cd /home/wheeltec/wheeltec_ros2/src/wheeltec_robot_nav2/map
手动保存地图:
ros2 run nav2_map_server map_saver_cli -f ~/map
使用rqt工具查看图像话题:
rqt_image_view
查看节点与话题关系
rqt_graph
在终端显示的路径下生成TF树pdf
ros2 run tf2_tools view_frames
vnc调整分辨率
xrandr --fb 1024x768
打开ros2容器,运行(只要运行一次)
ros2_start
进入ros2容器(每个终端窗口都要运行一次)
ros2
启动 cartographer 建图
ros2 launch wheeltec_nav2 save_map.launch.py
保存地图
ros2 launch wheeltec_nav2 save_map.launch.py
默认保存的地图地址是
/home/wheeltec/wheeltec_ros2/src/wheeltec_robot_nav2/map/WHEELTEC.yaml
启动地图导航
ros2 launch wheeltec_nav2 wheeltec_nav2.launch.py
底盘方向与XLerobot坐标轴定义
暂时无法在飞书文档外展示此内容